source(google.com.pk)
Gel Nail Kit Biography
It’s no State Styling Secret that when it comes to all things beauty, I’m lazy with a capital L.
Don’t get me wrong, I very much want the finished, perfectly adequately groomed product. I just don’t have the time to be fussing about to get there.
Especially with my nails.
Which is why I fell big time more than two years ago (way before that beauty wagon was hooked up to the band) for CND Shellac manicures.
For starters, I do love a sneaky beauty outsourcing.
For seconders, I’m SHOCKING with my nails. I should be locked up for Cruelty to Nails. I am that bad. So the fact that this beauty outsourcing could last me more than a day? Yep, big fan. HUGE.
Over the past year or so, I’ve reduced my Shellac habit outsourcing to about once a month, usually pinning a salon visit to an upcoming occasion or event.
My nails are happier with a little Nail-Cation in between … because while Shellac does not do to nails what my short affair with acrylics did back in the day, I found that if I did get back-to-back applications, my nails got weaker over time.
What I had also started to notice – and I’d be curious to find out if anyone else has found this too (or it’s just my dodgy nails?) - was that many of the colours just were not lasting like they did in the beginning. In under a week – sometimes just a few days – the colour would peel off like plastic. Especially with the opaque colours.
So, when a couple of the other gel nail companies introduced – and sent me* – home gel nail kits over the last few months, I decided to give them a go. Even though the very concept of DIY nails is technically outside of my lazy-girl beauty ways.
I’ve never had the salon versions of both of these brands – although some of the people I follow on Twitter from the US rave about the Gelish nail system – so I don’t have a salon experience to compare with the at-home version. Both use an LED lamp to cure the gel; as opposed to a UV lamp for Shellac. This makes for a quicker curing process.
But if you want to find out what I thought about the home versions, read on, Stylers.
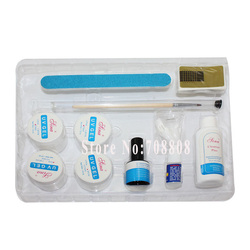
… and please, all you beautifully talented nail bloggers out there … I know. I do not give good mani. See above re preference for outsourcing.What you need: LED light ($99); Starter Kit – Cleanser, Remover, lint-free wipes, cuticle tool, nail file, pocket gel removers, primer, base + top ($79.95); colours $23.95 each
Time: less than 20 minutes
Process: Once you have everything set out in front of you, it’s quite easy to work through the steps required to achieve a good finished product. The starter kit includes everything, including the handy lint-free wipes for cleansing the nail. If you’ve had a Shellac salon application before, the steps are pretty much the same. Get your nails and cuticles in order, cleanse the nail, add base+top coat, two coats of colour and then base+top coat again with curing in between. Finish with a nail cleanser and some cuticle oil on each nail.
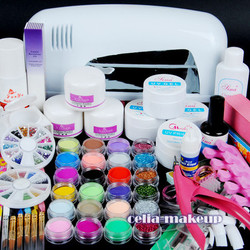
Nailing it: The LED light is more stable and more powerful than the Gelish Mini so it only required 30 second curing of each coat. Like the Gelish system, this Orly system claims to give you up to three weeks of chip-free nails. Unfortunately I didn’t get even a week with two fingers on my right hand … perhaps it is MY nails and applicator error. I much preferred the less time this system took though, so it was easy to go back and re-do the nails that lifted. Removal was simple, a little soaking in the pocket gel removers for 10 minutes then wipe and orange stick off.What you need: Mini Pro LED Curing light ($59.95); Mini Basix Kit – pH Bond, Foundation, Top it Off, Nourish, Cleanser, Artificial Nail Remover, nail file, orange sticks ($39.95); Mini Colour gels $19.95 each
Time: about 30 minutes
Process: Just like the Orly system above, the first step is a good one. You prep your nails as you would for any mani, dealing with dodgy cuticles and nail shape, then apply a primer – the Gelish Mini pH Bond. This soaks right into the nail bed and draws away any oils that might interfere with the layering and curing of the gel. It’s not until the final base coat that your nails are good to go (you still do the cleanser and cuticle oil on top as with the Orly system) but the staying power of the gel is proving pretty damn awesome.
Nailing it: The finish with this gel seems to be stronger than the Orly on my nails. I was impressed that the colour was super easy to apply and, although far from perfect, did make it almost fool-proof for me to achieve some sort of OK finish. The “tackiness” between each coat was something for me to get used to. And by getting used to I mean, watch for indadvertedly brushing off tacky-ed colour onto arm and then table. The lamp is not as robust as the Orly lamp but quite suitable for home use. Removal of the colour took a bit more time than the Orly but only a few minutes more.
Colours: 72 (I chose Tiger Blossom, a deep orange)
Where to buy: Price Attack, Hairhouse Warehouse and selected stockists. Phone 03 9575 0600
Stuff to consider
1. The initial outlay for either system is the equivalent to two-three salon gel applications. Once you have everything, it will be a matter of topping up your colour supply and other bits as they run out. There is still definitely a medium-term cost saving there for regular salon gel lovers.
2. Both this and the Gelish LED lamps are smaler than salon versions so you need to do your thumbs separately.
3. If you want to change your nail colour before the two-three weeks is up, you can. Just add regular polish over the top and remove with normal cleanser.
4. You do have to do it yourself! Yes, that means getting over your lazy-girl ways (don’t worry I get that you may never want to get over them … that’s ok too)


Gel Nail Kit Biography
It’s no State Styling Secret that when it comes to all things beauty, I’m lazy with a capital L.
Don’t get me wrong, I very much want the finished, perfectly adequately groomed product. I just don’t have the time to be fussing about to get there.
Especially with my nails.
Which is why I fell big time more than two years ago (way before that beauty wagon was hooked up to the band) for CND Shellac manicures.
For starters, I do love a sneaky beauty outsourcing.
For seconders, I’m SHOCKING with my nails. I should be locked up for Cruelty to Nails. I am that bad. So the fact that this beauty outsourcing could last me more than a day? Yep, big fan. HUGE.
Over the past year or so, I’ve reduced my Shellac habit outsourcing to about once a month, usually pinning a salon visit to an upcoming occasion or event.
My nails are happier with a little Nail-Cation in between … because while Shellac does not do to nails what my short affair with acrylics did back in the day, I found that if I did get back-to-back applications, my nails got weaker over time.
What I had also started to notice – and I’d be curious to find out if anyone else has found this too (or it’s just my dodgy nails?) - was that many of the colours just were not lasting like they did in the beginning. In under a week – sometimes just a few days – the colour would peel off like plastic. Especially with the opaque colours.
So, when a couple of the other gel nail companies introduced – and sent me* – home gel nail kits over the last few months, I decided to give them a go. Even though the very concept of DIY nails is technically outside of my lazy-girl beauty ways.
I’ve never had the salon versions of both of these brands – although some of the people I follow on Twitter from the US rave about the Gelish nail system – so I don’t have a salon experience to compare with the at-home version. Both use an LED lamp to cure the gel; as opposed to a UV lamp for Shellac. This makes for a quicker curing process.
But if you want to find out what I thought about the home versions, read on, Stylers.
… and please, all you beautifully talented nail bloggers out there … I know. I do not give good mani. See above re preference for outsourcing.What you need: LED light ($99); Starter Kit – Cleanser, Remover, lint-free wipes, cuticle tool, nail file, pocket gel removers, primer, base + top ($79.95); colours $23.95 each
Time: less than 20 minutes
Process: Once you have everything set out in front of you, it’s quite easy to work through the steps required to achieve a good finished product. The starter kit includes everything, including the handy lint-free wipes for cleansing the nail. If you’ve had a Shellac salon application before, the steps are pretty much the same. Get your nails and cuticles in order, cleanse the nail, add base+top coat, two coats of colour and then base+top coat again with curing in between. Finish with a nail cleanser and some cuticle oil on each nail.
Nailing it: The LED light is more stable and more powerful than the Gelish Mini so it only required 30 second curing of each coat. Like the Gelish system, this Orly system claims to give you up to three weeks of chip-free nails. Unfortunately I didn’t get even a week with two fingers on my right hand … perhaps it is MY nails and applicator error. I much preferred the less time this system took though, so it was easy to go back and re-do the nails that lifted. Removal was simple, a little soaking in the pocket gel removers for 10 minutes then wipe and orange stick off.What you need: Mini Pro LED Curing light ($59.95); Mini Basix Kit – pH Bond, Foundation, Top it Off, Nourish, Cleanser, Artificial Nail Remover, nail file, orange sticks ($39.95); Mini Colour gels $19.95 each
Time: about 30 minutes
Process: Just like the Orly system above, the first step is a good one. You prep your nails as you would for any mani, dealing with dodgy cuticles and nail shape, then apply a primer – the Gelish Mini pH Bond. This soaks right into the nail bed and draws away any oils that might interfere with the layering and curing of the gel. It’s not until the final base coat that your nails are good to go (you still do the cleanser and cuticle oil on top as with the Orly system) but the staying power of the gel is proving pretty damn awesome.
Nailing it: The finish with this gel seems to be stronger than the Orly on my nails. I was impressed that the colour was super easy to apply and, although far from perfect, did make it almost fool-proof for me to achieve some sort of OK finish. The “tackiness” between each coat was something for me to get used to. And by getting used to I mean, watch for indadvertedly brushing off tacky-ed colour onto arm and then table. The lamp is not as robust as the Orly lamp but quite suitable for home use. Removal of the colour took a bit more time than the Orly but only a few minutes more.
Colours: 72 (I chose Tiger Blossom, a deep orange)
Where to buy: Price Attack, Hairhouse Warehouse and selected stockists. Phone 03 9575 0600
Stuff to consider
1. The initial outlay for either system is the equivalent to two-three salon gel applications. Once you have everything, it will be a matter of topping up your colour supply and other bits as they run out. There is still definitely a medium-term cost saving there for regular salon gel lovers.
2. Both this and the Gelish LED lamps are smaler than salon versions so you need to do your thumbs separately.
3. If you want to change your nail colour before the two-three weeks is up, you can. Just add regular polish over the top and remove with normal cleanser.
4. You do have to do it yourself! Yes, that means getting over your lazy-girl ways (don’t worry I get that you may never want to get over them … that’s ok too)
Gel Nail Kit
Gel Nail Kit
Gel Nail Kit
Gel Nail Kit
Gel Nail Kit
Gel Nail Kit
Gel Nail Kit
Gel Nail Kit
Gel Nail Kit
Gel Nail Kit
Gel Nail Kit
No comments:
Post a Comment